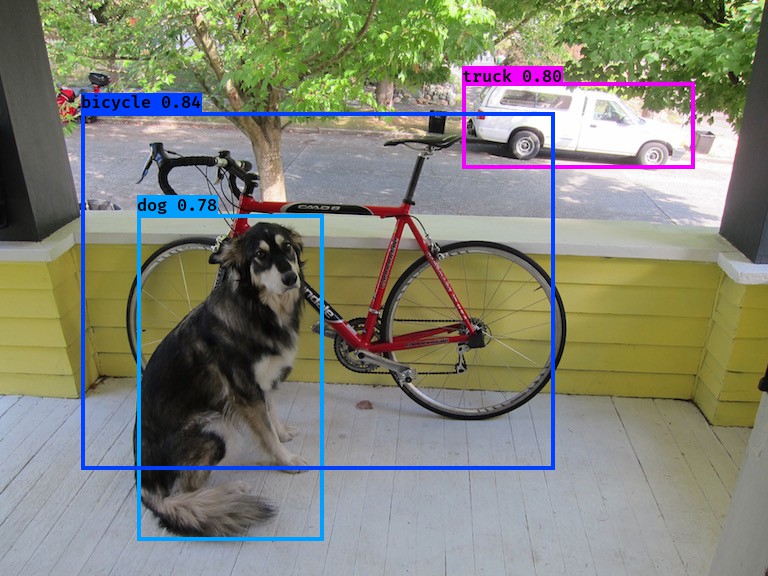
学習済みの一般物体検出(YOLOv2)をローカルPC上で動かしてみた
以前、学習済みの一般物体検出としてSSDを動かしてみましたが、同様にYOLOにもトライしてみましたので、結果を記録しておきたいと思います。
YOLOの解説はこちらをご参照ください。
YOLOは現時点、version3まで出ていますが、今回はversion2について実施しました。フレームワークはKerasを用います。
動作環境
OS:Windows 10 Home (64bit)
Python 3.5
Anaconda 4.2.0
Keras 2.2.4
手順
①GITHUBに上がっているこちらの学習済みモデルをダウンロードし、任意の場所に解凍します。
https://github.com/allanzelener/YAD2K

<学習済みモデル>
入力画像サイズ:608x608
学習データセット:Pascal VOC
検出クラス:20クラス
"aeroplane", "bicycle", "bird", "boat", "bottle", "bus", "car", "cat",
"chair", "cow", "diningtable", "dog", "horse", "motorbike", "person",
"pottedplant", "sheep", "sofa", "train", "tvmonitor"
②こちらから学習済みの重みファイル(yolo.weights)をダウンロードし、zipファイルを解凍し、YAD2K-masterフォルダの直下に置きます。
http://pjreddie.com/media/files/yolo.weights
③こちらからDarknet版のYOLOv2をダウンロードしてzipファイルを解凍し、/cfg/yolov2.cfgをYAD2K-master直下に配置します。
https://github.com/pjreddie/darknet

④Anacondaプロンプトを起動し、プロジェクトディレクトリに移動します。
以下のコマンドを実行し、cfg, weightsファイルからKerasのモデルを生成します。
$ python yad2k.py yolov2.cfg yolo.weights model_data/yolo.h5
⑤test_yolo.pyの64行目からを以下のように変更します。
<変更前>
    if not os.path.exists(output_path):
        print('Creating output path {}'.format(output_path))
        os.mkdir(output_path)
<変更後>
    c_path = os.getcwd()
    output_file = "out"
    o_path = os.path.join(c_path, output_file)
    if not os.path.exists(o_path):
        print('Creating output path {}'.format(output_path))
        os.mkdir(o_path)
⑥test_yolo.pyの197行目を以下のように変更します。
<変更前>
image.save(os.path.join(output_path, image_file), quality=90)
<変更後>
image.save(os.path.join(o_path, image_file), quality=90)
※⑤、⑥を実施しないとエラーが出ます。 (PermissionError)
⑦以下のコマンドを実行するとimageフォルダの画像に対して物体検出を行います。結果はoutフォルダにバウンディングボックス、信頼度付きの画像として保存されます。
$ python test_yolo.py model_data/yolo.h5
入力画像

検出結果

⑧Webカメラの画像を入力し、リアルタイムに物体検出を行うため、test_yolo_cam.pyを新たに作成します。作成したソースコードは以下の通りです。
#! /usr/bin/env python
"""Run a YOLO_v2 style detection model on test images."""
import argparse
import colorsys
import imghdr
import os
import random
import cv2

import numpy as np
from keras import backend as K
from keras.models import load_model
from PIL import Image, ImageDraw, ImageFont

from yad2k.models.keras_yolo import yolo_eval, yolo_head

parser = argparse.ArgumentParser(
    description='Run a YOLO_v2 style detection model on test images..')
parser.add_argument(
    'model_path',
    help='path to h5 model file containing body'
    'of a YOLO_v2 model')
parser.add_argument(
    '-a',
    '--anchors_path',
    help='path to anchors file, defaults to yolo_anchors.txt',
    default='model_data/yolo_anchors.txt')
parser.add_argument(
    '-c',
    '--classes_path',
    help='path to classes file, defaults to coco_classes.txt',
    default='model_data/coco_classes.txt')
parser.add_argument(
    '-t',
    '--test_path',
    help='path to directory of test images, defaults to images/',
    default='images')
parser.add_argument(
    '-o',
    '--output_path',
    help='path to output test images, defaults to images/out',
    default='images/out')
parser.add_argument(
    '-s',
    '--score_threshold',
    type=float,
    help='threshold for bounding box scores, default .3',
    default=.3)
parser.add_argument(
    '-iou',
    '--iou_threshold',
    type=float,
    help='threshold for non max suppression IOU, default .5',
    default=.5)

# カメラの起動
cap = cv2.VideoCapture(0)
if not cap.isOpened():
    raise IOError(("Couldn't open video file or webcam. If you're "
    "trying to open a webcam, make sure you video_path is an integer!"))

# Compute aspect ratio of video
vidw = cap.get(cv2.CAP_PROP_FRAME_WIDTH)
vidh = cap.get(cv2.CAP_PROP_FRAME_HEIGHT)
vidar = vidw/vidh

def _main(args):
    model_path = os.path.expanduser(args.model_path)
    assert model_path.endswith('.h5'), 'Keras model must be a .h5 file.'
    anchors_path = os.path.expanduser(args.anchors_path)
    classes_path = os.path.expanduser(args.classes_path)
    test_path = os.path.expanduser(args.test_path)
    output_path = os.path.expanduser(args.output_path)

    #    if not os.path.exists(output_path):
    #        print('Creating output path {}'.format(output_path))
    #        os.mkdir(output_path)
    c_path = os.getcwd()
    output_file = "out"
    o_path = os.path.join(c_path, output_file)
    if not os.path.exists(o_path):
        print('Creating output path {}'.format(output_path))
        os.mkdir(o_path)

    sess = K.get_session()  # TODO: Remove dependence on Tensorflow session.

    with open(classes_path) as f:
        class_names = f.readlines()
    class_names = [c.strip() for c in class_names]

    with open(anchors_path) as f:
        anchors = f.readline()
        anchors = [float(x) for x in anchors.split(',')]
        anchors = np.array(anchors).reshape(-1, 2)

    yolo_model = load_model(model_path)

    # Verify model, anchors, and classes are compatible
    num_classes = len(class_names)
    num_anchors = len(anchors)
    # TODO: Assumes dim ordering is channel last
    model_output_channels = yolo_model.layers[-1].output_shape[-1]
    assert model_output_channels == num_anchors * (num_classes + 5), \
        'Mismatch between model and given anchor and class sizes. ' \
        'Specify matching anchors and classes with --anchors_path and ' \
        '--classes_path flags.'
    print('{} model, anchors, and classes loaded.'.format(model_path))

    # Check if model is fully convolutional, assuming channel last order.
    model_image_size = yolo_model.layers[0].input_shape[1:3]
    is_fixed_size = model_image_size != (None, None)

    # Generate colors for drawing bounding boxes.
    hsv_tuples = [(x / len(class_names), 1., 1.)
                  for x in range(len(class_names))]
    colors = list(map(lambda x: colorsys.hsv_to_rgb(*x), hsv_tuples))
    colors = list(
        map(lambda x: (int(x[0] * 255), int(x[1] * 255), int(x[2] * 255)),
            colors))
    random.seed(10101)  # Fixed seed for consistent colors across runs.
    random.shuffle(colors)  # Shuffle colors to decorrelate adjacent classes.
    random.seed(None)  # Reset seed to default.

    # Generate output tensor targets for filtered bounding boxes.
    # TODO: Wrap these backend operations with Keras layers.
    yolo_outputs = yolo_head(yolo_model.output, anchors, len(class_names))
    input_image_shape = K.placeholder(shape=(2, ))
    boxes, scores, classes = yolo_eval(
        yolo_outputs,
        input_image_shape,
        score_threshold=args.score_threshold,
        iou_threshold=args.iou_threshold)

    while(True):

        # 動画ストリームからフレームを取得
        ret, cv_img = cap.read()
        if not ret:
            print("Done!")
            return

        image = cv2pil(cv_img)
        if is_fixed_size:  # TODO: When resizing we can use minibatch input.
            resized_image = image.resize(
                tuple(reversed(model_image_size)), Image.BICUBIC)
            image_data = np.array(resized_image, dtype='float32')
        else:
            # Due to skip connection + max pooling in YOLO_v2, inputs must have
            # width and height as multiples of 32.
            new_image_size = (image.width - (image.width % 32),
                              image.height - (image.height % 32))
            resized_image = image.resize(new_image_size, Image.BICUBIC)
            image_data = np.array(resized_image, dtype='float32')
            print(image_data.shape)

        image_data /= 255.
        image_data = np.expand_dims(image_data, 0)  # Add batch dimension.

        out_boxes, out_scores, out_classes = sess.run(
            [boxes, scores, classes],
            feed_dict={
                yolo_model.input: image_data,
                input_image_shape: [image.size[1], image.size[0]],
                K.learning_phase(): 0
            })
        #print('Found {} boxes'.format(len(out_boxes)))

        font = ImageFont.truetype(
            font='font/FiraMono-Medium.otf',
            size=np.floor(3e-2 * image.size[1] + 0.5).astype('int32'))
        thickness = (image.size[0] + image.size[1]) // 300

        for i, c in reversed(list(enumerate(out_classes))):
            predicted_class = class_names[c]
            box = out_boxes[i]
            score = out_scores[i]

            # ignore low score results
            if(score < 0.5):
                continue

            label = '{} {:.2f}'.format(predicted_class, score)

            draw = ImageDraw.Draw(image)
            label_size = draw.textsize(label, font)

            top, left, bottom, right = box
            top = max(0, np.floor(top + 0.5).astype('int32'))
            left = max(0, np.floor(left + 0.5).astype('int32'))
            bottom = min(image.size[1], np.floor(bottom + 0.5).astype('int32'))
            right = min(image.size[0], np.floor(right + 0.5).astype('int32'))
            #print(label, (left, top), (right, bottom))

            if top - label_size[1] >= 0:
                text_origin = np.array([left, top - label_size[1]])
            else:
                text_origin = np.array([left, top + 1])

            # My kingdom for a good redistributable image drawing library.
            for i in range(thickness):
                draw.rectangle(
                    [left + i, top + i, right - i, bottom - i],
                    outline=colors[c])
            draw.rectangle(
                [tuple(text_origin), tuple(text_origin + label_size)],
                fill=colors[c])
            draw.text(text_origin, label, fill=(0, 0, 0), font=font)
            del draw

        #image.save("test.jpg", quality=90)
        cv_img2 = pil2cv(image)

        # 表示
        cv2.imshow("Show FLAME Image", cv_img2)

        # escを押したら終了。
        k = cv2.waitKey(10);
        if k == 27:  break;

    cap.release()
    cv2.destroyAllWindows()
    sess.close()

def cv2pil(image):
    ''' OpenCV型 -> PIL型 '''
    new_image = image.copy()
    if new_image.ndim == 2:  # モノクロ
        pass
    elif new_image.shape[2] == 3:  # カラー
        new_image = cv2.cvtColor(image, cv2.COLOR_BGR2RGB)
    elif new_image.shape[2] == 4:  # 透過
        new_image = cv2.cvtColor(image, cv2.COLOR_BGRA2RGBA)
    new_image = Image.fromarray(new_image)
    return new_image

def pil2cv(image):
    ''' PIL型 -> OpenCV型 '''
    new_image = np.array(image)
    if new_image.ndim == 2:  # モノクロ
        pass
    elif new_image.shape[2] == 3:  # カラー
        new_image = new_image[:, :, ::-1]
    elif new_image.shape[2] == 4:  # 透過
        new_image = new_image[:, :, [2, 1, 0, 3]]
    return new_image

if __name__ == '__main__':
    _main(parser.parse_args())
⑨以下のコマンドを実行するとWebカメラの映像が表示され、検出された物体に信頼度と共にバウンディングボックスが表示されます。
$ python test_yolo_cam.py model_data/yolo.h5
Youtubeの映像をカメラで撮影し、その映像に対して物体検出

歩行者や自転車、奥の車は小さく検出できていませんが、大きく映っているバスや車は精度よく検出できていることがわかります。
感想
YOLOv2のオープンソースはWebカメラの映像に対して適応するサンプルコードがなかったため、今回いろいろなものを参考にして自作しました。
やはり、自分である目的のコードを作成するには検出プログラムの詳細を理解しなければならないため、ただ動かすだけよりスキルアップになったと感じます。
今後はオリジナルのものを作ることに注力できればと思います。
また、YOLOversion3が動作する環境も作成したので、その内容も次回投稿します。
参考サイト
YOLOv2(Keras / TensorFlow)でディープラーニングによる画像の物体検出を行う - Qiita