FaceNet(顔認証)を使って自動撮影カメラを作ってみた
前回、GITHUBで公開されているFaceNetを動かしてみました。
今回はこれを使って登録した人の顔を自動で撮影するおもちゃを作ってみたいと思います。
ソースコードの修正
FaceNetのcompare.pyを修正して、USBカメラで撮影した映像に対して、
FaceNetで顔認証を行うスクリプトを作成しました。
①ライブラリインポートとMain関数、引数取得用の関数
from __future__ import absolute_import
from __future__ import division
from __future__ import print_function

from scipy import misc
import tensorflow as tf
import numpy as np
import sys
import os
import cv2
import copy
import glob
import argparse
import facenet
import align.detect_face
from timeit import default_timer as timer

minsize = 20  # minimum size of face
fd_threshold = [ 0.6, 0.7, 0.7 ]  # three steps's threshold
factor = 0.709  # scale factor
input_image_size = 160
fr_threshold = 1.2

def main(args):
  margin = args.margin
  with tf.Graph().as_default():
    #gpu_options = tf.GPUOptions(per_process_gpu_memory_fraction=args.gpu_memory_fraction)
    gpu_options = tf.GPUOptions(allow_growth=True) # GPUのメモリ割り当て方法を変更
    sess = tf.Session(config=tf.ConfigProto(gpu_options=gpu_options,
                log_device_placement=False))
    with sess.as_default():
      # 顔検出のネットワーク作成 MTCNN
      pnet, rnet, onet = align.detect_face.create_mtcnn(sess, None)

      image_paths = glob.glob(args.reg_paths) # 登録済み画像のフォルダ
      nrof_images = len(image_paths) #登録済み画像の数(only one person)

      # 登録済み画像から顔のみを抽出したリストを作成
      images = load_and_align_data(image_paths, nrof_images, pnet, rnet, onet, args)
      nrof_images = len(images) #登録に成功した顔の数(only one person)

      # Load the model
      facenet.load_model(args.model)
      # Get input and output tensors
      images_placeholder = tf.get_default_graph().get_tensor_by_name("input:0")
      embeddings = tf.get_default_graph().get_tensor_by_name("embeddings:0")
      phase_train_placeholder = tf.get_default_graph().get_tensor_by_name("phase_train:0")
      embedding_size = embeddings.get_shape()[1]
      # Run forward pass to calculate embeddings
      feed_dict = { images_placeholder: images, phase_train_placeholder:False }
      emb_reg = sess.run(embeddings, feed_dict=feed_dict)  # 登録済み画像の特徴ベクトル抽出

      # カメラ映像/動画ファイルの取得
      video_capture = cv2.VideoCapture(0) # camera input
      print('Start Recognition')

      #fps計算 初期化
      frame_num = 1
      accum_time =0
      curr_fps = 0
      prev_time = timer()
      fps = "FPS: ??"

      while True:
        ret, frame = video_capture.read()
        if ret == False:
          break

        if frame.ndim == 2:
          frame = facenet.to_rgb(frame)
        frame = frame[:, :, 0:3]
        #frame = cv2.resize(frame, (640, 352)) # 入力画像をリサイズ
        bounding_boxes, _ = align.detect_face.detect_face(frame, minsize,
                                          pnet, rnet, onet, fd_threshold, factor)
        nrof_faces = bounding_boxes.shape[0]
        print('Detected_FaceNum: %d' % nrof_faces, end='')

        if nrof_faces > 0:  #顔を検出した場合
          det = bounding_boxes[:, 0:4]
          frame_size = np.asarray(frame.shape)[0:2]
          cropped = []
          scaled = []
          scaled_reshape = []
          v_bb = np.zeros((nrof_faces,4), dtype=np.int32)

          for i in range(nrof_faces):
            emb_array = np.zeros((1, embedding_size))
            v_bb[i][0] = np.maximum(det[i][0]-margin/2, 0)   # 左上 x(横)
            v_bb[i][1] = np.maximum(det[i][1]-margin/2, 0)   # 左上 y(縦)
            v_bb[i][2] = np.minimum(det[i][2]+margin/2, frame_size[1])   # 右下 x(横)
            v_bb[i][3] = np.minimum(det[i][3]+margin/2, frame_size[0])   # 右下 y(縦)
            cropped.append(frame[v_bb[i][1]:v_bb[i][3], v_bb[i][0]:v_bb[i][2], :])
            cropped[i] = facenet.flip(cropped[i], False)
            scaled.append(misc.imresize(cropped[i],
                         (input_image_size, input_image_size), interp='bilinear'))
            scaled[i] = cv2.resize(scaled[i], (input_image_size,input_image_size),
                                   interpolation=cv2.INTER_CUBIC)
            scaled[i] = facenet.prewhiten(scaled[i])
            scaled_reshape.append(scaled[i].reshape(-1,input_image_size,input_image_size,3))

            cv2.rectangle(frame, (v_bb[i][0], v_bb[i][1]), (v_bb[i][2], v_bb[i][3]), (0, 255, 0), 2)

            feed_dict = {images_placeholder: scaled_reshape[i],
                                                 phase_train_placeholder: False}
            emb_array[0, :] = sess.run(embeddings, feed_dict=feed_dict) # 特徴ベクトルの抽出

            # 識別(登録済み画像の特徴ベクトルとのユークリッド距離を計算)
            dist_ave = cal_distance(emb_reg, emb_array, nrof_images)
            print('  %1.4f  ' % dist_ave, end='')

            if dist_ave < fr_threshold: # 認識のしきい値
              #plot result idx under box
              text_x = v_bb[i][0]
              text_y = v_bb[i][3] + 20
              print('Find registered person', end='')
              cv2.rectangle(frame, (v_bb[i][0], v_bb[i][1]),
                                         (v_bb[i][2], v_bb[i][3]), (0, 0, 255), 2)
            else:
              print('', end='')
        else:  #顔非検出の場合
          print('  Alignment Failure', end='')
        print('')

    #frame_num表示
    cv2.putText(frame, str(frame_num), (3,30), cv2.FONT_HERSHEY_SIMPLEX,
                                               0.50, (255, 0, 0), thickness=2)
    frame_num += 1

    #fps計算
    curr_time = timer()
    exec_time = curr_time - prev_time
    prev_time = curr_time
    accum_time = accum_time + exec_time
    curr_fps = curr_fps + 1
    if accum_time > 1:
      accum_time = accum_time - 1
      fps = "FPS: " + str(curr_fps)
      curr_fps = 0
    cv2.putText(frame, fps, (3,15), cv2.FONT_HERSHEY_SIMPLEX, 0.50, (255, 0, 0), thickness=2)

    cv2.imshow('Video', frame)
    if cv2.waitKey(1) & 0xFF == ord('q'):
      break

    video_capture.release()
  cv2.destroyAllWindows()


def parse_arguments(argv):
  parser = argparse.ArgumentParser()
  parser.add_argument('model', type=str,
    help='Could be either a directory containing the meta_file and ckpt_file or a model protobuf (.pb) file')
# parser.add_argument('image_files', type=str, nargs='+', help='Images to compare')
  parser.add_argument('reg_paths', type=str, help='The path of registered human faces')
  parser.add_argument('--image_size', type=int,
    help='Image size (height, width) in pixels.', default=160)
  parser.add_argument('--margin', type=int,
    help='Margin for the crop around the bounding box (height, width) in pixels.', default=44)
  parser.add_argument('--gpu_memory_fraction', type=float,
    help='Upper bound on the amount of GPU memory that will be used by the process.', default=1.0)
  return parser.parse_args(argv)
②MTCNNで顔検出し、顔画像のリストを作成
def load_and_align_data(image_paths, nrof_images,pnet, rnet, onet, args):
  img_list = []
  for image in image_paths:
    img = misc.imread(os.path.expanduser(image), mode='RGB') # 画像読み込み RGB形式

    img_size = np.asarray(img.shape)[0:2]
    bounding_boxes, _ = align.detect_face.detect_face(img, minsize,
                     pnet, rnet, onet, fd_threshold, factor) # 顔検出
    if len(bounding_boxes) < 1: # 顔が検出されなかった場合
      print("can't detect face", image)
      continue
    det = np.squeeze(bounding_boxes[0,0:4]) #顔の検出ポイント
    cropped = cropped_face(det, img, img_size, args)
    img_list.append(cropped)
  if nrof_images > 1 :
    images = np.stack(img_list) # 登録済み画像から顔のみ抽出したリスト
  else :
    images = img_list
  return images
③顔領域のクロッピング
def cropped_face(det, img, img_size, args):
  margin = args.margin
  bb = np.zeros(4, dtype=np.int32)
  bb[0] = np.maximum(det[0]-margin/2, 0)   # 左上 x(横)
  bb[1] = np.maximum(det[1]-margin/2, 0)   # 左上 y(縦)
  bb[2] = np.minimum(det[2]+margin/2, img_size[1])   # 右下 x(横)
  bb[3] = np.minimum(det[3]+margin/2, img_size[0])   # 右下 y(縦)

  cropped = img[bb[1]:bb[3],bb[0]:bb[2],:] # bounding boxの場所指定
  aligned = misc.imresize(cropped,
    (input_image_size, input_image_size), interp='bilinear') # クロッピングしてリサイズ
  aligned = facenet.prewhiten(aligned)
  return aligned
④各顔のユークリッド距離を計算
def cal_distance(emb_reg, emb_video, nrof_images):
  dist = np.zeros(nrof_images, dtype=np.float64)
  dist_ave = 0.
  cnt = 1
  for j in range(nrof_images):
    dist[j] = np.sqrt(np.sum(np.square(np.subtract(emb_reg[j,:],
                        emb_video[0, :])))) #ユークリッド距離計算
  dist.sort()   #距離が短い順に並び替え
  for x in range(3):  # kNN, k=3
    dist_ave += dist[x]
    cnt += 1
    if cnt > len(dist):
      break

  dist_ave = dist_ave / float(cnt-1) # 登録済み画像とのユークリッド距離(最近点3個)
  return dist_ave
実行時には以下のように引数を指定します。
$ python [重みファイルのパス] [登録する顔画像のパス] \
$ --image_size 160 --margin 32 --gpu_memory_fraction 0
登録したい顔画像をフォルダに入れて、引数でそのパスを指定します。
簡単のため、登録できる人数は一人だけとしていますが、
画像は複数枚入れてもOKです。
パス指定は data/registered/*のようにワイルドカードで複数枚の指定が可能です。
その他の引数は元のcompare.pyと同様です。
処理内容を図にすると以下のような感じです。
登録顔画像と未知の顔の距離を計算し、閾値比較をします。
顔画像を4枚以上登録した場合は距離が近い方から3点の距離の平均値を
閾値比較に使用しています。

閾値は fr_thresholdという変数で定義しています。
上記ソースコードでは閾値は1.2ですが、カメラの撮影条件によって
適切な値に設定してください。
ラズパイ上で動作させる
このスクリプトをさらに応用して、登録した顔がカメラに写ったら
その画像をJPGで保存するプログラムを作ります。
さらに、これをラズパイ上で動作させ、撮影したことが分かるように
撮影したらLEDを1秒間点灯させるようにしたいと思います。
(ラズパイで動かす意味はあまりありませんが・・・)
以前勉強した、ラズパイでLEDを点灯させる処理を上記のソースコードに追加します。
追加したソースコード
import RPi.GPIO as GPIO
import time
import subprocess

LED_PIN = 26          # 36pin

def main():
    num = 1
    GPIO.setmode(GPIO.BCM)
    GPIO.setup(LED_PIN ,GPIO.OUT)

    if dist_ave < fr_threshold: # 認識のしきい値
      #plot result idx under box
      text_x = v_bb[i][0]
      text_y = v_bb[i][3] + 20
      print('Find registered person', end='')
      cv2.rectangle(frame, (v_bb[i][0], v_bb[i][1]),
                                 (v_bb[i][2], v_bb[i][3]), (0, 0, 255), 2)

      GPIO.output(LED_PIN , GPIO.HIGH)
      cv2.imwrite("picture{0:03d}.jpg".format(num), frame)  #保存先を指定
      time.sleep(1)
      GPIO.output(LED_PIN , GPIO.LOW)
      num = num + 1
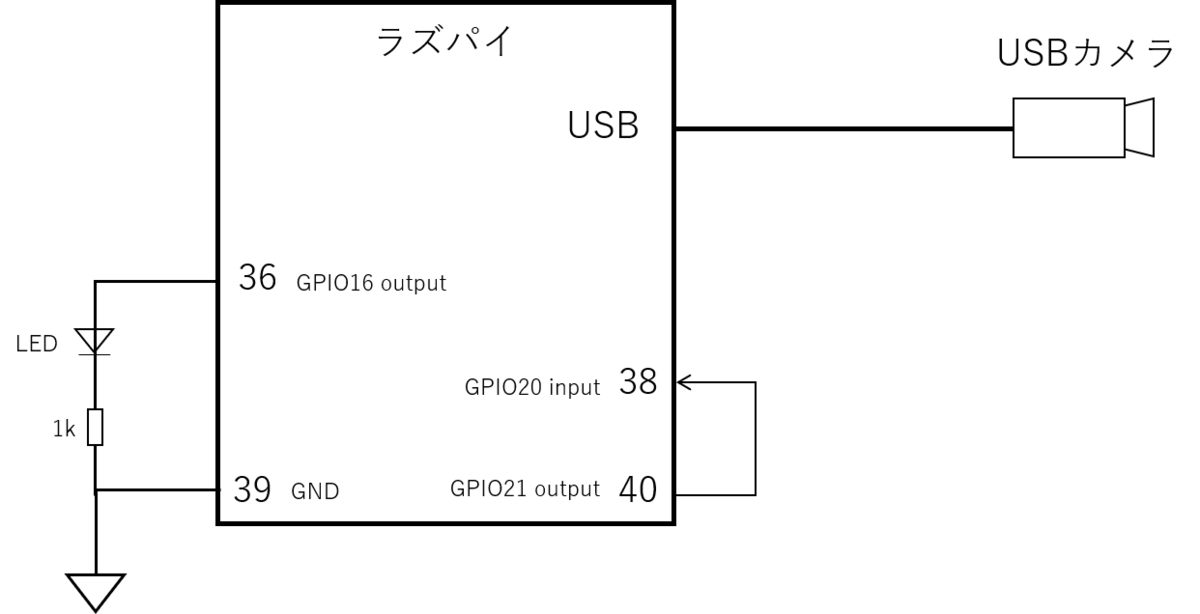
回路図は前回同様こちらです。38,40ピンは今回使いません。

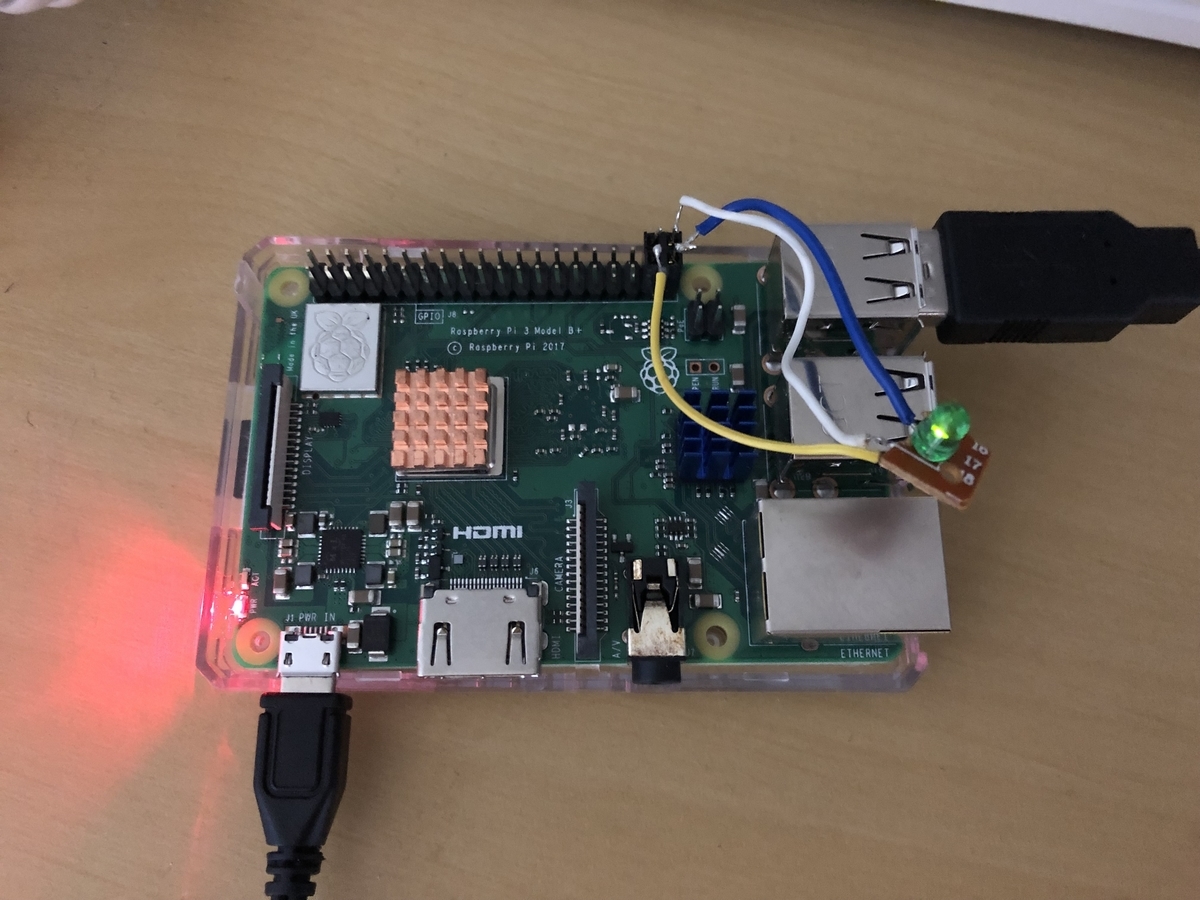
作成したスクリプト実行させてみるとこのように登録顔を見つけたときにLEDが点灯します。リード線で接続している緑色のLEDがGPIO16 36ピンにつながっています。

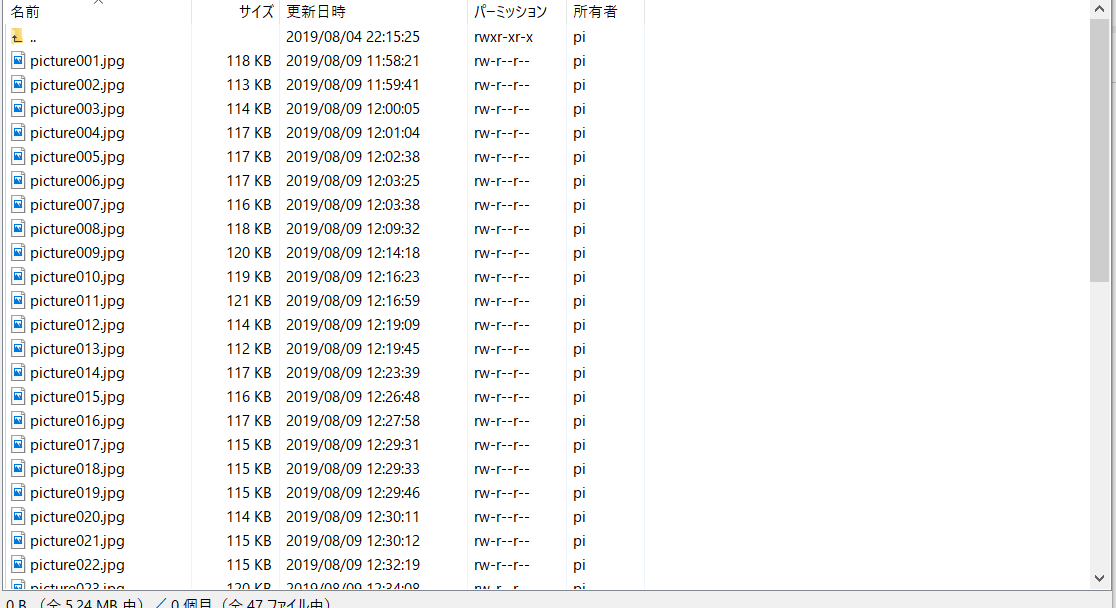
息子の写真1枚登録し、1~2時間ほどスクリプトを走らせてみた結果、このように写真が撮れています。(リモートからラズパイにアクセスしています。)

全部で47枚の写真が撮れており、正しく息子を判別して写真撮影できたのはわずか7枚(正解率約15%)でした。そもそも顔でないものを顔と誤判別していたり、親子である私と息子の識別ができていないなど、性能はまだまだでした。登録顔が1枚だけだったので、いろいろな角度の顔画像を登録すればもう少し性能が上がるのではと思います。
まとめ
GITHUBで公開されているFaceNetの顔認識を使って、登録した人の写真を自動で撮影する機器をラズベリーパイで作ってみました。登録顔が1枚だけだったので、精度が今一つでしたが、FaceNetの概要を理解でき、また、所望の機能をプログラムで実現することができました。今後もディープラーニングを使った機器のアイデアを考えて、実際に作っていけたらと考えています。